OAuth Authentication
This page contains details about using OAuth in Immich.
Unable to set app.immich:/ as a valid redirect URI? See Mobile Redirect URI for an alternative solution.
Overview
Immich supports 3rd party authentication via OpenID Connect (OIDC), an identity layer built on top of OAuth2. OIDC is supported by most identity providers, including:
Prerequisites
Before enabling OAuth in Immich, a new client application needs to be configured in the 3rd-party authentication server. While the specifics of this setup vary from provider to provider, the general approach should be the same.
-
Create a new (Client) Application
- The Provider type should be
OpenID ConnectorOAuth2 - The Client type should be
Confidential - The Application type should be
Web - The Grant type should be
Authorization Code
- The Provider type should be
-
Configure Redirect URIs/Origins
The Sign-in redirect URIs should include:
app.immich:/- for logging in with OAuth from the Mobile Apphttp://DOMAIN:PORT/auth/login- for logging in with OAuth from the Web Clienthttp://DOMAIN:PORT/user-settings- for manually linking OAuth in the Web Client
Redirect URIs should contain all the domains you will be using to access Immich. Some examples include:
Mobile
app.immich:/(You MUST include this for iOS and Android mobile apps to work properly)
Localhost
http://localhost:2283/auth/loginhttp://localhost:2283/user-settings
Local IP
http://192.168.0.200:2283/auth/loginhttp://192.168.0.200:2283/user-settings
Hostname
https://immich.example.com/auth/loginhttps://immich.example.com/user-settings
Enable OAuth
Once you have a new OAuth client application configured, Immich can be configured using the Administration Settings page, available on the web (Administration -> Settings).
| Setting | Type | Default | Description |
|---|---|---|---|
| Enabled | boolean | false | Enable/disable OAuth |
| Issuer URL | URL | (required) | Required. Self-discovery URL for client (from previous step) |
| Client ID | string | (required) | Required. Client ID (from previous step) |
| Client Secret | string | (required) | Required. Client Secret (previous step) |
| Scope | string | openid email profile | Full list of scopes to send with the request (space delimited) |
| Signing Algorithm | string | RS256 | The algorithm used to sign the id token (examples: RS256, HS256) |
| Storage Label Claim | string | preferred_username | Claim mapping for the user's storage label¹ |
| Storage Quota Claim | string | immich_quota | Claim mapping for the user's storage¹ |
| Default Storage Quota (GiB) | number | 0 | Default quota for user without storage quota claim (Enter 0 for unlimited quota) |
| Button Text | string | Login with OAuth | Text for the OAuth button on the web |
| Auto Register | boolean | true | When true, will automatically register a user the first time they sign in |
| Auto Launch | boolean | false | When true, will skip the login page and automatically start the OAuth login process |
| Mobile Redirect URI Override | URL | (empty) | Http(s) alternative mobile redirect URI |
Claim is only used on user creation and not synchronized after that.
The Issuer URL should look something like the following, and return a valid json document.
https://accounts.google.com/.well-known/openid-configurationhttp://localhost:9000/application/o/immich/.well-known/openid-configuration
The .well-known/openid-configuration part of the url is optional and will be automatically added during discovery.
Auto Launch
When Auto Launch is enabled, the login page will automatically redirect the user to the OAuth authorization url, to login with OAuth. To access the login screen again, use the browser's back button, or navigate directly to /auth/login?autoLaunch=0.
Mobile Redirect URI
The redirect URI for the mobile app is app.immich:/, which is a Custom Scheme. If this custom scheme is an invalid redirect URI for your OAuth Provider, you can work around this by doing the following:
- Configure an http(s) endpoint to forwards requests to
app.immich:/ - Whitelist the new endpoint as a valid redirect URI with your provider.
- Specify the new endpoint as the
Mobile Redirect URI Override, in the OAuth settings.
With these steps in place, you should be able to use OAuth from the Mobile App without a custom scheme redirect URI.
Immich has a route (/api/oauth/mobile-redirect) that is already configured to forward requests to app.immich:/, and can be used for step 1.
Example Configuration
Authentik Example
Google Example
Google Example
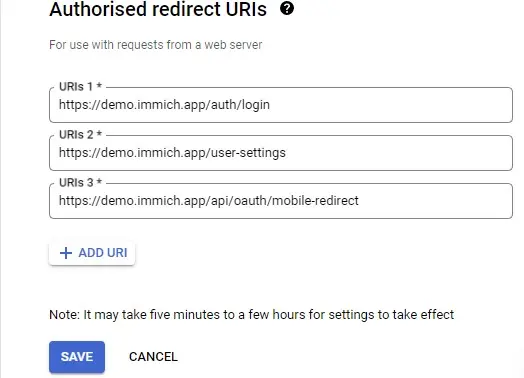
Configuration of Authorised redirect URIs (Google Console)

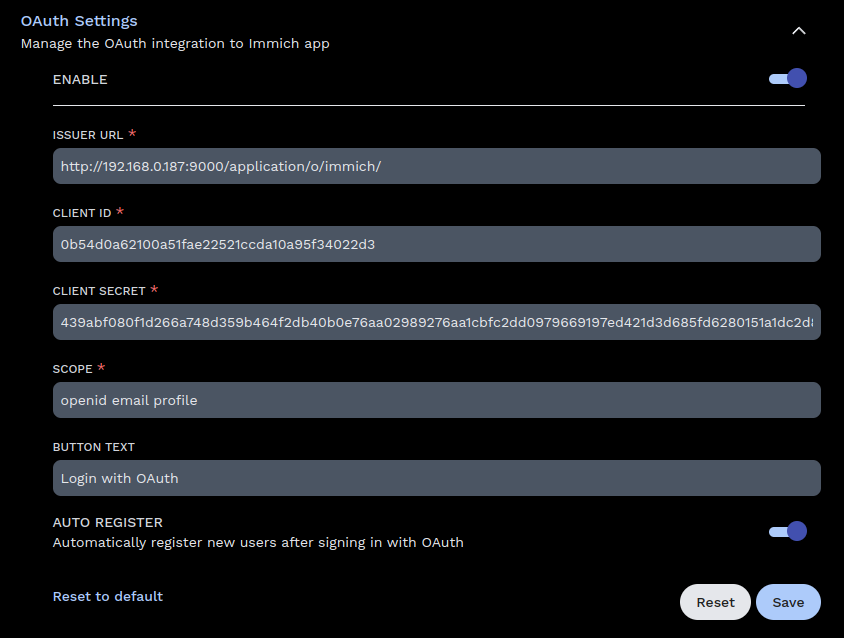
Configuration of OAuth in System Settings
| Setting | Value |
|---|---|
| Issuer URL | https://accounts.google.com |
| Client ID | 7******************vuls.apps.googleusercontent.com |
| Client Secret | G******************OO |
| Scope | openid email profile |
| Signing Algorithm | RS256 |
| Storage Label Claim | preferred_username |
| Storage Quota Claim | immich_quota |
| Default Storage Quota (GiB) | 0 (0 for unlimited quota) |
| Button Text | Sign in with Google (optional) |
| Auto Register | Enabled (optional) |
| Auto Launch | Enabled |
| Mobile Redirect URI Override | Enabled (required) |
| Mobile Redirect URI | https://demo.immich.app/api/oauth/mobile-redirect |
